Sundays in the Sewing Room- I have been challenged!!

This month’s challenge was Aurora Borealis.

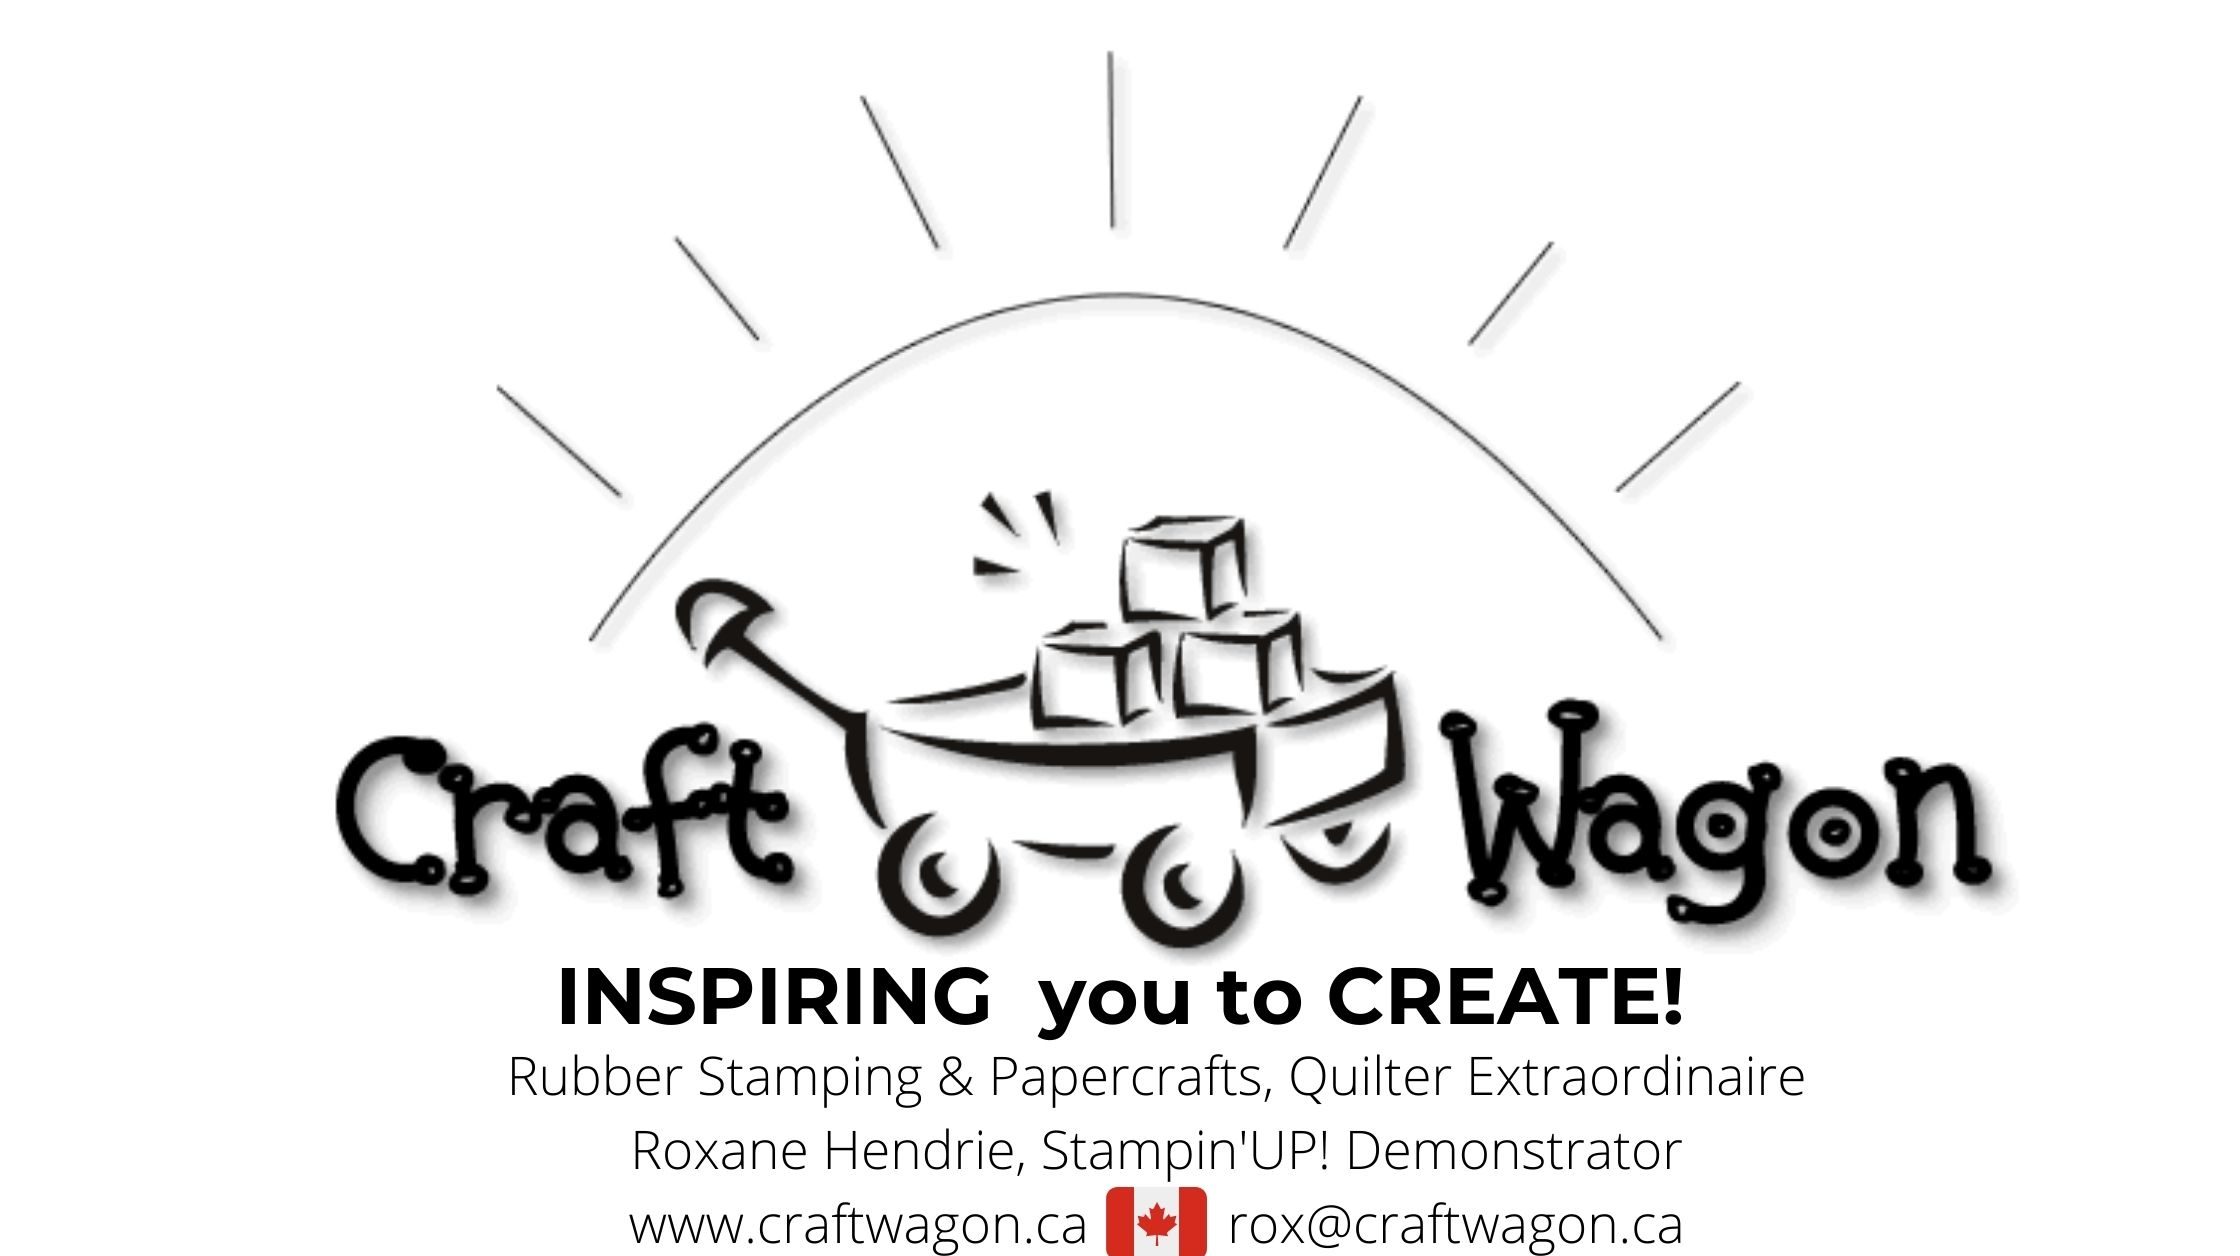
That’s it, no other guidelines! I knew right away that I had the right fabric, leftover strip sets from my Bargello Quilt. I had a vision in my head and began the research (aka – surfing the internet- the only surfing you will see this girl do!)


My idea was blues and purples with a touch of green. Have you ever searched “aurora borealis”? well some of them are an intense green and black. This did not match the vision in my head. So I pressed on… yes countless hours on the internet, completely distracted by the original intention of the project. I did find a great recipe for my Instant Pot along the way!

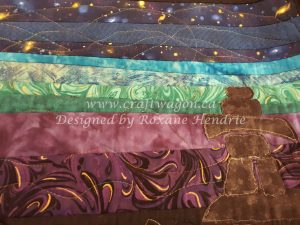
There were a lot of different ideas floating around, and I had thought of creating a  mini bargello. But time was ticking. I also thought that I wanted it to be a long narrow quilt, the same size as a Row by Row. When I pieced it together it seemed like the two elements were far away and disconnected. I shortened the piece to about 24″ and now I feel it tells a story. Have you ever created a bargello quilt?


Sundays in the Sewing Room- Christmas Countdown

I believe this one got missed being posted for October.

Christmas Countdown
12 weeks of Christmas

Countdown to Christmas with me. For the next 12 Sundays til Christmas, I will feature a sewing project that is either Christmas related or a gift idea. I would love to hear what sewing projects you are working on.

I created this quilt using 48 charm squares as part of my quilt guild’s President’s Challenge.

The challenge was to bring in 48 charm squares ( all the same) in exchange for 48 different charm squares the following month. We were challenged to create something with them.  In an earlier post I shared what I made with my Halloween charms.  Now if you know me, you know that I LOVE matchy-matchy, symmetry, geometric shapes…so a scrappy quilt is definitely a challenge for me.

I had a small postcard pattern for a chevron quilt on my wish list of things to try. What a great way to check two things off my list! I added the olive green background fabric, borders, backing and binding. It’s a small lap quilt size and would likely fit a toddler bed. It was pieced and quilted by machine.  I like that it was a smaller quilt project that I could manage on my machine. I followed the chevrons for the quilting. Gift #1 is done!

Creatively Yours,

Roxane


Sundays in the Sewing Room- Zipper Pouch

Here is a simple project to feature some of your favourtie fabric or to if you are shopping your stash!

There are lots of tutorials for this project, but I liked how this one had a lining and french seams!

I wanted to give a small gift to my coworker for her birthday. I gifted her a Me to We Education Rafiki.

Here is an excerpt from their website:

In Swahili, the word for friend is rafiki. This Rafiki helps a child in a developing community access education. With education, learners become leaders, and a textbook becomes a vehicle for discovery and exploration—expanding perspectives and building understanding across people and cultures.

When you receive your new Me to We Artisans accessory, look out for the unique code on the back of your product package! Enter it online at trackyourimpact.com to learn more about the life-changing impact your purchase makes.

I love that this gift supports education. There are other rafikis to choose from but I thought this one was fitting as we are educators.


And yes…I created a card to match:

Could this be a new thing? Cards coordinating gifts?

Leave me a comment below if you would like to see how to create the card

Sundays in the Sewing Room – Modern Quilt Guild

Well this year I am embarking on a new sewing challenge for myself: Modern Quilting

I went to our local Modern Quilt Guild, just in time to participate in the Christmas Gift Exchange. We were to create an 18″ x 18″ mini wall quilt. I toyed with the idea of a Christmas themed one, but thought that it would be used for a few months of the year. I was hopeful that the owner would love it so much that she would display it all year round!

I searched the internet for days, trying to find a design idea I liked or could jump off from to create my own…well the search was long, which meant my sewing time was short! Alas, I discovered this pattern on Craftsy. There is a short video tutorial to go along with it. The downloadable pattern has instructions for multiple sizes. The picture of  the full size quilt looks amazing. I took the cushion pattern and adapted it to fit within the measurement constraints.

Here is the final product:

Here is a close up of the quilting. I did straight line quilting about 1/4″ apart. I am pleased with the finished piece…It was hard to give it away!

I did corner hangers and a corner label that doubled as a pocket so I could include a coordinating card:

Image may contain: 4 people, stripesThe photo above was taken at the guild. Interesting how we interpret which end is the top!

Leave me a comment to let me know which way you prefer the design??Orange triangle at the top or bottom?

Sundays in the Sewing Room…final countdown

Well, it’s here!! Christmas is just around the corner. I have a quick and easy project that you can put together in under an hour. Not including a trip to the dollar store to collect your supplies. If you are like me, there are too many distractions.

This year we are going for the Canadian Cottage Christmas theme. Red, white, black and plaid!!! This was a quick project I put together for an added touch to the kitchen.

Materials List:

one hot pad

one dishtowel

matching thread and button

marking pen

sewing machine and basic sewing supplies ( scissors, sewing needle, etc)

HOW TO:

  1. Find the middle of the dishtowel and sew across using a gathering stitch. I turn the tension to 0 and the longest straight stitch. Make sure to leave tails at either end
  2. Mark the middle of the hot pad with a removable marking pen, I use the Frixon pen as it dissappears.
  3. Gather the towel so that it is as wide as the hot pad, then sew the towel to the hot pad on the marked line.
     
  4. The gathering threads can be removed if you like.
  5. Fold in half and position button. Sew button on
  6. Done, attach to stove or dishwasher handle for a quick and easy decoration
  7. Also great for drying hands!Leave me a comment if you have tried this!
    Happy Crafting,

    Roxane

    Wishing everyone a safe and Merry Christmas!

Sundays in the Sewing Room- 3 more weeks! Advent Apron

Today I wanted to share the apron I created for my niece for her advent calendar.This apron was a panel I purchase during a shop hop. There are a few more items that were on the panel. I have them put aside for when my niece comes for her baking and craft day. So, I will feature them in a future blog post (stay tuned)!

I love how the little gingerbread cookies are peeking out of the pocket!

Her advent calendar features gingerbread cookies as well…was it a theme? Perhaps! In my excitement to deliver it, I forgot to take a photo of the calendar.

Sundays in the Sewing Room Christmas Countdown…4 more weeks

Let’s Get Organized!!
Well this week . I spent a good amount of time preparing for my Christmas Card Clinic, Sunday was spent tidying up and putting away.
Stay tuned for a video showcasing this years’ cards. This is a project I was working on in the summer….
Here is a small project idea that holds a tablet,notebook and a few other office on the go goodies.
Unfortunately, I can not locate the link for this tutorial.
I will do an update on the post, when I do.
This idea is a quick and easy project, I used stuff from my stash and decided on the black and white because I can gift to male or female.
Creatively Yours,
R

Sundays in the Sewing Room- Christmas Countdown 5 weeks to go… Evening INspiration


I created these from a free pattern by Moda, titled “Little Break”.  The pattern featured Zen Chic fabric line designed by Brigitte Heitland.

This was a cute bundle I picked up at a shop hop, they were all sold out of her microchips to create this quick and easy project.  The intention was to do a sewing project with DD but well, now it will be a gift for her. They are bigger than most mug rugs I have made in the past. Smaller than a placemat. Measures in at : 8.5″ x 10.5″.

This can be completed on one night with simple quilting. I hand sew my bindings, it took me about an hour to sew this binding.

Creatively Yours,

R

Christmas Countdown – A Mug Rug or Tea Mat?

Tea mat/Mug Rug


Last summer we went on a family trip along the East Coast, to Maine. I had a list of quilt shop’s participating in the Row by Row along our route. I came across this cute pattern to make a mug rug. It is a great way to use up 6″ x 6″ scraps. I love how there is a little pocket for tea and a spoon. It would be a quick and easy gift to put together for friends, neighbours or teachers.

I created  it,by sandwiching batting between 2- 6″ squares of fabric, making the pocket and then used 2-1/4″ bias binding to finish it off. Imade 3 in this fabric for my family at my quilt retreat and I have a few more on the sewing table for Christmas.

Creatively Yours,

Roxane

Sunday in the Sewing Room- Charity Quilt

I love to sew! Early on I would sew, mostly my own clothes. I even made my own wedding dress!! Then I discovered quilting..wow, what an eye opener to  me! This encompasses all the things as a child I was drawn to: fractions, shapes, geometry, colour theory, sorting, puzzles, cut and paste, and paper. It’s amazing how I have gone through my creative journey only to discover that the things I loved most in childhood are the things that I revert back to as an adult.

Take a moment and think of your childhood games and activities, what were some of your favourites? (Leave a comment below and share). Our senses play a big part in our creativity. In quilting the feel of the fabric, the colour combinations and the shapes/patterns need to speak to me.

I decided to join a local chapter. I had been cautioned that it was a large group…and it was! I was amazed at the talent and the sharing of that talent within the group. Many quilt guilds give back to the community and this group was no different. The quilts go to 15 different organizations including neonatal blankets.

At my first meeting I came upon a table filled with quilt kit (and I LOVE kits!). I soon found out these kits were to make charity quilts.

I was excited! This kit jumped off the table into my hands..did the polka dots have anything to do with it? Or was it the combination of pink, black and white? I eagerly signed up. One year later here is the finished project ( I never said I was fast!).


I love that the pattern was simple to piece together and  ALL the elements for the completion of the quilt were included (great for taking to retreats). The best part is that somewhere, someone will be cuddled under the warmth and love of a handmade quilt. We may never meet, but I am glad that I made the time to create a hug for someone who may need it more than me.

Creatively Yours,

R


Sunday in the Sewing Room – Fabric Basket


Does this fabric look familiar?  It is leftovers I had after I made the Sweetpea pods. I was at a card swap yesterday, (more on that later this week), and I used this cute basket for holding my cards. It holds 20 cards, who knew!!

Be sure to check out The Fabric Shop when you are in Gander, Newfoundland. They have a great selection of fabric, classes and notions.

I made this to put next to my sewing machine for all my tech stuff- I love to listen to instrumental music while I sew. It helps me to focus on the task, and block out the distractions…like cooking and cleaning. Who has time for that when there is a sewing project on the table?

I created this basket using 2- 10″ squares and 1-10″ square of fusible batting.

I quilted the outer layer and batting in straight lines on the diagonal.

Then RST I sewed around, leaving a 2″ opening to turn it RSO. Edge stitch making sure to catch the opening.

To create the corners fold in half with RST and mark a 2″ triangle on the bottom of each corner, sew.

Fold in opposite direction and repeat. Turn RSO and fold flaps down. I attached mine with daisy buttons.

Here is a great tutorial from Seaside Stitches

Creatively Yours,

R


Sweetpea Pods

Sunday in the Sewing Room:

The fabric for this project came all the way from Gander,Newfoundland!!!  

The fabric is part of the Row by Row collection. Participating fabric shops  can create a collector license plate. Last year they collated the plates into fabric yardage. I love reading the plates, they are very punny. The lining fabric is black with white daisies –
OOPS! I forgot to take a photo of the inside 🙁

The pattern is from Lazy Girl Designs.

The trickiest part of this project is figuring out the zipper. I found the step-by step photos very helpful.

Once I had that down, I was good to go! Two 10″ squares will get you two sweetpea pods. One for you and one for a friend. A great way to use up stray layer cakes.

I hope that you will give it a try, if you do, leave a comment.

Creatively Yours,


Sweet Treats – Candy Baskets

These baskets were created using a kit from a shop hop I did in 2013.

Yes, I am FINALLY getting to them!!

We moved recently and as I am going through my craft stuff, I realized how much I love kits. ( it’s because I have TONS of them!)

This particular kit had all the materials. I had to supply the thread. I find that most kits include the main fabric and I am left to hunt around for the perfect piece of fusible interfacing. In some cases this slows me down enough to get distracted and start another project, or sorting my fabric. I was able to get straight to the cutting mat and finish up these baskets in an evening.

I think these baskets will be handy for small gift giving: socks, nail polish, jam and of course candies!!!

Small Baskets ( 3″ x 3″ x 2.5″)

Main, lining, interfacing: cut 1 @ 7″ x 9-1/2″

Handles: cut 2@3″ x 5″


Large Baskets ( 3.5″ x 3.5″ x 4″)

Main, lining, interfacing: cut 1@ 8″ x 11-1/2″

Handles: cut 2@ 3″ x 5″


Sweet Summer Treats


Bag Lady! That’s me. I love to shop for bags, bag patterns, fabric to make my own bags! I have often been heard saying ” I love this fabric, it would make a great bag!”

I originally bought the donut fabric to create favours for my Mom’s annual quilt retreat. As most fabric lovers can relate, I bought WAAAAY too much fabric. So, what’s a bag lady to do with this leftover fabric, but make a tote bag!

The ice cream fabric was purchased to create a summer mug rug for a swap I participated in.

Last month I was invited to a birthday party and found myself looking for a tote to put the gift in…but all I had was Christmas totes. I set out to create these totes so I am ready for the next summer birthday!

For these bags the inner fabric is simple. I have made quite a few of these bags, sometimes with fun fabric both inside and out and they always get rave reviews. My sister-in-law tells me that it fits A LOT of STUFF!

I created them using:

Outer Fabric -cut 2 @ 13-1/2″ x 14-1/2″

Inner Fabric- cut 2 @ 13-1/2″x 14-1/2″

Handles: 4″ WOF

The tutorial I used was from Skip To My Lou

The bag is reversible. I have made a few adaptations to the original design.

I added pockets to these ones. I have made pockets with multiple slots so that a pen and phone can fit.

I have made them larger or smaller depending on the amount of fabric I have.

The smallest I have made is 12″ x 11″, to fit a standard coil notebook.

Please leave a comment below if you have tried this tutorial, would love to see what others’ are creating.

Creatively Yours,

R


Sunday in the Sewing Room

At my local quilt guild we were presented with a President’s Challenge that lasted the whole year. Each month we were to bring in 40 – 5″ charm squares (all the same), then the next month we would pick up our packet of assorted 5″ charm squares. The challenge was to create something with the charm squares. While I did not participate in all of them I did choose three: Halloween, Christmas and blue. I missed purple month…boohoo)

I created the totes on the left and right with a tutorial by Missouri Star Quilt Co.- you can get three totes from one pack of charm squares! I was amazed! The tutorial is quick, easy to follow and she offers some great tips.

The basket in the middle is aptly named Charm Baskets.( 20 charm squares). This pattern came from a quilt store I found on a shop hop in 2010. Threads That Bind is located in the small town of  Maxwell,Ontario.

I have made a few alterations on the original pattern. The pattern calls for fusible fleece for both the lining and outer fabric. I used soft & stable foam stabilizer for the outer and nothing for the lining. What I liked about the foam stabilizer is the ease of use. I intentionally quilted “stitch in the ditch” at the parts of the basket where it would fold, this helps the basket keep it’s shape.

Next time I will try a lightweight stabilizer for the lining. While it is fine without, I feel it would give the inner basket a bit more stability and the lining would have an overall smooth clean finish.

I was left with 4 charm squares, so I created the mug mat. This was a fun challenge…stay tuned to see what I made with the Christmas charm squares.

Creatively Yours!